Jul 31, 2023 By Team YoungWonks *
What is a Pico W? What can a Pico W be used for?
Raspberry Pi Pico W is a compact yet powerful microcontroller that has been specifically designed by the Raspberry Pi foundation to push the boundaries of microcomputing. It is the latest addition to the Raspberry Pi family and is driven by the RP2040 microcontroller chip, which was designed by Raspberry Pi themselves.
This small device is packed with high-performance capabilities and features, yet it maintains a reasonable energy efficiency which makes it suitable for a wide range of applications. The board is equipped with 2MB of flash memory and a programmable IO system that can be used to support a range of interfaces. The Raspberry Pi Pico W also offers a wide range of addons to enhance its functionality.
The onboard Wi-Fi capability is what differentiates the Raspberry Pi Pico W from its predecessors. This addition opens up a world of new possibilities, such as Internet of Things (IoT) applications, home automation, and much more. To get started, all you need is a micro-USB cable and the Python language, opening up this technology to users of all skill levels.
What are the specifications of Raspberry Pi Pico W?
The following are some of the specifications of the Raspberry Pi Pico W:
- Microprocessor: The Pico W is powered by the RP2040 microcontroller chip, offering a dual-core Arm Cortex-M0+ processor with a flexible clock running up to 133 MHz and 264kB on-chip SRAM.
- Memory: The device is equipped with 2MB of onboard QSPI flash memory, adequate for storing complex programs and executing various applications.
- Connectivity: The standout feature of the Raspberry Pi Pico W is its 2.4 GHz onboard wireless LAN. This wireless LAN is connected to the microcontroller via the SPI (Serial Peripheral Interface). This integrated connectivity feature allows for seamless online accessibility and enables IoT applications. The Pico W also has support for Bluetooth 5.2.
- Input/Output: It features a PIO (Programmable IO) state machine system that supports a range of interfaces, empowering users to connect it with various peripherals. The Raspberry Pi Pico W has a set of multi-function GPIO pins that are versatile, supporting digital input/output, analog input, PWM channels, and Serial interfaces. Those pins include 2 × SPI, 2 × I2C, 3 × 12-bit ADC, 2 × UART, 16 × controllable PWM channels. The Pico W also has a 3-pin SWD (Serial Wire Debug) connector that provides developers with a straightforward way to debug the board.
- Power: One of the major advantages of the Raspberry Pi Pico W is its energy efficiency. The device requires a low power supply of just 1.8-5.5V, making it ideal for battery-powered applications. Also, it has BLE (Bluetooth Low Energy) support.
- Programming Language: Python, which is known for its simplicity and versatility, is the primary programming language for the Raspberry Pi Pico W, making it accessible for both beginners and advanced users.
For more information on the Raspberry Pi Pico W, please refer to the following datasheet:
https://datasheets.raspberrypi.com/picow/pico-w-datasheet.pdf
What is the difference between Pico W and Pico WH?
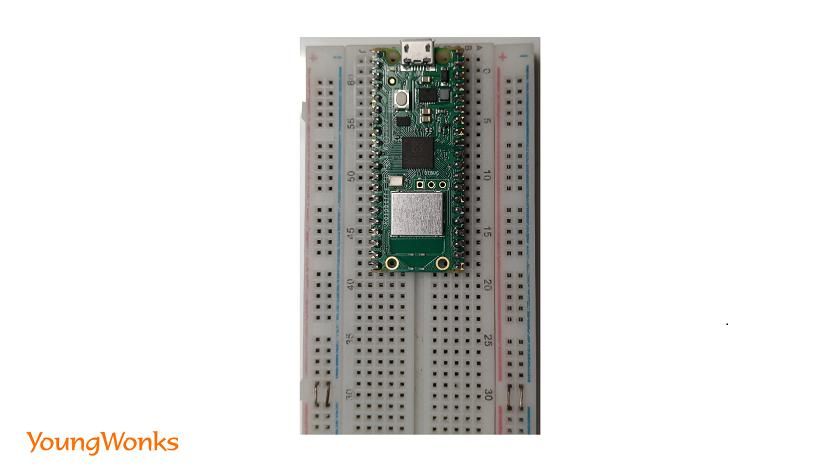
The Raspberry Pi Pico W and Raspberry Pi Pico WH are siblings with subtle differences. The Raspberry Pi Pico W, as discussed earlier, is a remarkable microcontroller with Wi-Fi capabilities. On the other hand, the Raspberry Pi Pico WH comes with an additional pre-soldered header on a PCB with the castellated pads. This inclusion of a soldered header makes the WH version more beginner-friendly, particularly for those who are not comfortable with soldering. It provides easy access to the 40 GPIO pins, enabling the user to connect a variety of external devices and modules without any additional soldering.
Both versions maintain the core features of the Raspberry Pi Pico series, including the versatile RP2040 chip, 2MB of QSPI flash memory, and the PIO (Programmable IO) state machine system. Choosing between them depends largely on your comfort level with soldering and the requirements of your specific project.
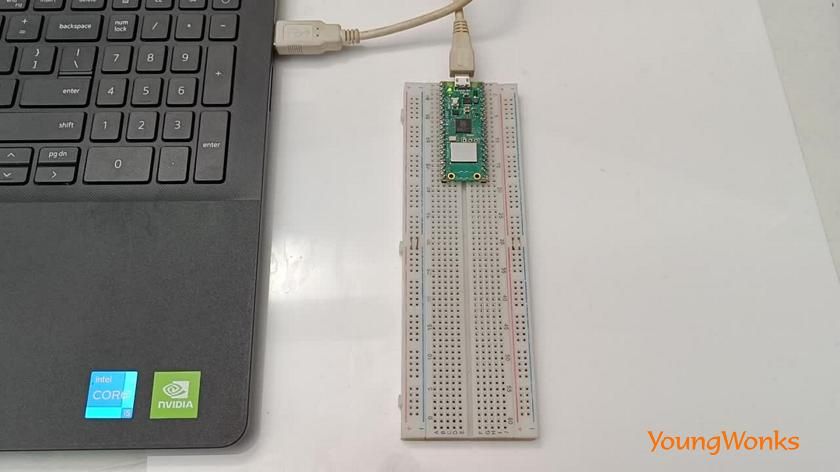
This is how the Raspberry Pi Pico WH placed on a breadboard looks like:
How to set up the Raspberry Pi Pico W on Microsoft Windows 10/11?
To set up the Raspberry Pi Pico W (or Pico WH) on a Microsoft Windows 10/11 machine, you can go through the following steps. The steps remain almost the same for a MacBook and Linux machine.
Step 1: Buy a Raspberry Pico W or Pico WH
To get started, the first step is to buy the Raspberry Pi Pico W or Pico WH. You can easily search on Google for Raspberry Pi Pico W, and it will directly take you to the official Raspberry Pi website where you can purchase it. If you decide to buy it, you'll find multiple places where it is available, including popular platforms like Amazon.
If you opt for the Raspberry Pi Pico WH variant, it comes with headers already soldered on. This convenient feature makes your job much easier, saving you time and effort in the setup process. With the headers pre-installed, you can seamlessly connect the Pico to other components (like breadboard) and explore its capabilities without any additional hassle.
Step 2: Learn about the Raspberry Pi Pico W
Let's conduct a quick search for the Raspberry Pi Pico to discover more about it. We can visit the official https://www.raspberrypi.com website and navigate to the hardware section for detailed information.
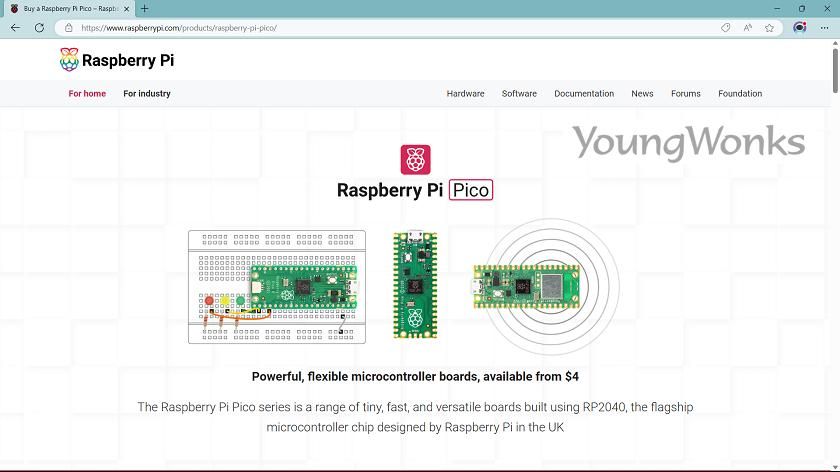
The website provides basic specifications right at the beginning, giving us an overview of the device. Additionally, there is a helpful pinout diagram that visually represents the connections. As we scroll down, we come across some informative links related to the design and connectivity aspects.
The documentation covers a range of topics, including a comprehensive guide on getting started with the Pico, which walks us through the initial setup and configuration. Furthermore, we can find a section dedicated to connecting the Pico to the internet. And last but not least, there's detailed information about the Raspberry Pi Pico SDK (Python SDK and C/C++ SDK), providing insights into the software development framework. The Pico SDK, documentation and example programs are also available on GitHub that can be accessed via https://github.com/raspberrypi/pico-sdk.
With such thorough documentation at our disposal, we can confidently dive into the world of the Pico and unlock its endless possibilities.
Our initial task is to comprehend and install MicroPython on the Raspberry Pi Pico. This step is crucial as it sets the foundation for the rest of our code development. The Pico W also supports CircuitPython by Adafruit as an alternative to MicroPython which adds some extra features.
Step 3: Install MicroPython on the Pico W
To connect the Raspberry Pi Pico W or Pico WH in MicroPython, follow these steps.
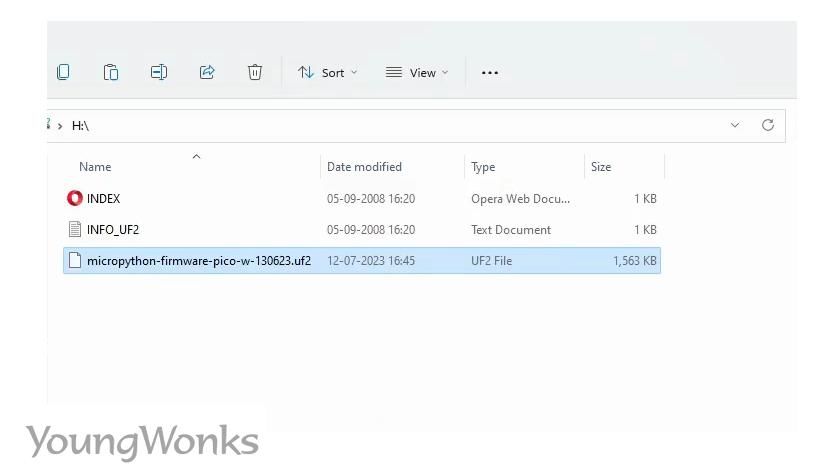
- First, hold down the BOOTSEL button on the board while plugging it in with a micro-USB cable. This will allow your computer to recognize it as a USB drive.
- Next, download the firmware from the website and drag and drop it into the drive. Windows will detect the device differently and prompt you for information. It will set up the board in File System mode.
- Once done, you can start writing Python code. Installing MicroPython is that simple!
Step 4: Check if Raspberry Pi Pico W is detected
For beginners, we can easily check if the device is detected on Windows by following a few simple steps.
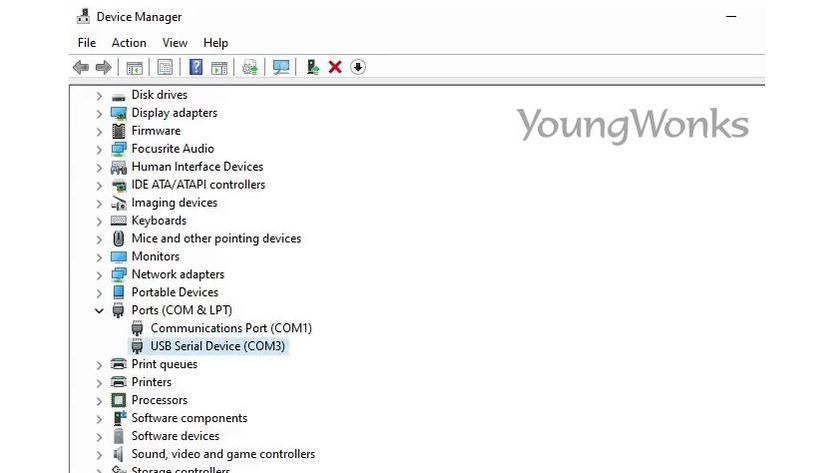
- First, open the Device Manager by right-clicking on the Start menu and selecting it from the list.
- Once the Device Manager is open, navigate to the Ports (COM & LPT) section. Here, you will find a list of connected devices.
- Look for the USB Serial Device entry to confirm if the device is properly detected.
Step 5: Install Thonny IDE on Windows
Now let’s take a closer look at how to get started with writing our Python code. To begin, we will refer back to the documentation we mentioned earlier, specifically focusing on the Python SDK. Within the SDK, we'll dive into the IDE section, where we'll explore the integration using Thonny. This particular IDE option is versatile and user-friendly, making it the ideal choice for us to begin working with Pico.
To get started, we simply need to download Thonny and ensure compatibility with our operating system. Whether you're using Linux, MacOS, or Windows, Thonny is designed to work seamlessly across the board. Once downloaded and installed, setting up your Pico becomes a breeze. You can even follow the steps for installing the firmware on your Pico device.
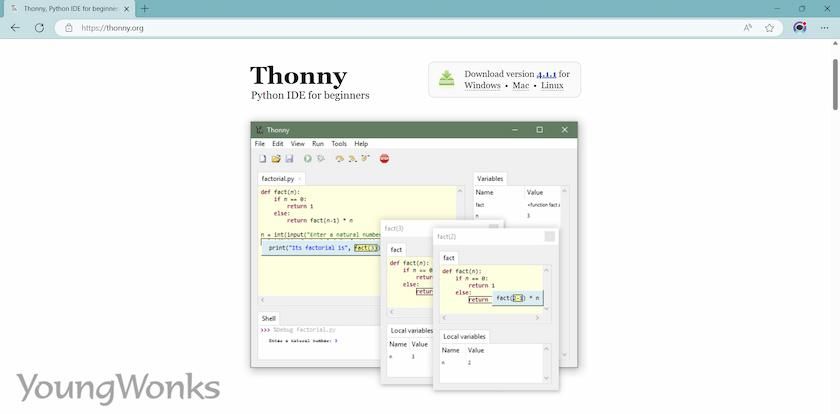
Let’s go ahead and search for Thonny IDE. On their website, you'll find all three variants readily available. For our purposes, we'll opt for the Windows 64-bit variant and proceed with the installation, keeping most of the default settings intact.
To launch the Thonny IDE, start by opening the application on your computer. Once the IDE window is open, navigate to the "Tools" menu and click on "Options". In the Options window, locate the "Interpreter" section. Here, you will find a dropdown menu where you can select the desired interpreter. Choose "MicroPython (Raspberry Pi Pico)" from the dropdown menu.
Make sure to keep the remaining options in the window at their default values to allow for automatic detection. Once you have made the selection, you should see "MicroPython" and "Raspberry Pi Pico" displayed on the shell. This indicates that the program will now use the selected interpreter instead of your computer's default interpreter when executing print statements or other commands.
Step 6: Blink the Raspberry Pi Pico W onboard LED
If we delve deeper into the documentation, we come across a straightforward Python program specifically designed to blink the onboard LED on the Raspberry Pi Pico. For your convenience, here is the direct link to the program:
https://github.com/raspberrypi/pico-micropython-examples/blob/master/blink/blink.py
To proceed, simply copy the provided code into the Thonny IDE, and run the program for the time being. Just click on the play button, and as the code executes, you will witness the onboard LED commence its rhythmic blinking, showcasing the successful execution of the program.
Step 7: Connect the Raspberry Pi Pico W to a Wi-Fi network
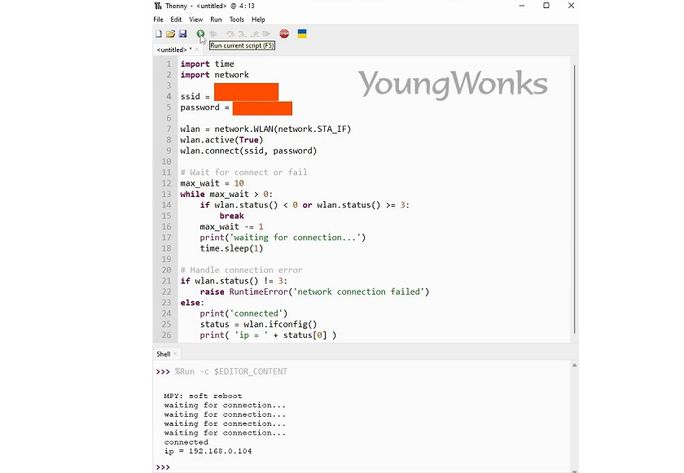
Let's explore how to connect the Raspberry Pi Pico to a Wi-Fi network. In the section 3.6 of datasheet https://datasheets.raspberrypi.com/picow/connecting-to-the-internet-with-pico-w.pdf, you'll find a code snippet that explains how to connect to a Wi-Fi network. This code is simple and doesn't involve disconnection and reconnection. However, there is a larger code implementation available as well. We will copy this code into our editor and make necessary changes, such as providing the network SSID and password. After modifying the code, it will display the IP address that you can use to communicate with Pico W.
The modified code along with the output should look like:
Understanding some of the above steps can be complicated for some readers. Therefore, we have added a YouTube video that explains the above steps and gives you a live demonstration.
Mastering Raspberry Pi Pico W with YoungWonks
The Raspberry Pi Pico W is a remarkable microcontroller that opens up a new frontier for innovators and learners alike, offering wireless connectivity options that drastically expand the potential for creative projects and applications. At YoungWonks, we understand the importance of staying ahead in the fast-evolving field of technology. That’s why we incorporate the latest tools such as the Raspberry Pi Pico W into our curriculum. Our Coding Classes for Kids are specifically designed to introduce young minds to the foundational concepts of programming, setting the stage for more advanced exploration. For those eager to dive deeper into Python programming, our Python Coding Classes for Kids offer comprehensive lessons that are perfect for mastering the skills needed to leverage the full capabilities of the Raspberry Pi Pico W. Meanwhile, our Raspberry Pi, Arduino, and Game Development Coding Classes provide hands-on experience, showing students how to integrate this versatile microcontroller into a variety of projects, from Internet of Things (IoT) applications to sophisticated robotics, ensuring a well-rounded educational experience.
Frequently asked questions
This section answers some of the frequently asked questions related to Raspberry Pi Pico W.
Does Raspberry Pi Pico have Wi-Fi?
Yes, the Raspberry Pi Pico W variant has built-in Wi-Fi capabilities. The Pico W adds on-board single-band 2.4GHz wireless interfaces (802.11n) using the Infineon CYW43439. The Raspberry Pi Pico without wireless LAN capabilities can still be used when the network connectivity is not needed.
Is the Pi Pico worth it?
The value of the Raspberry Pi Pico lies in its versatility and affordability. It acts as a blank canvas, offering hobbyists, students, and engineers the opportunity to create a wide range of electronic projects. Despite its low cost, the Pico is packed with a powerful RP2040 microcontroller board, a range of GPIO pins, and the ability to run MicroPython. This makes it a highly useful tool for both beginners learning to program and experienced developers seeking a compact, capable board for their projects.
Is Raspberry Pi Pico better than Arduino?
The Raspberry Pi Pico and Arduino are both excellent platforms, each with its strengths, and the choice between the two often depends on the specifics of your project. The Raspberry Pi Pico is incredibly cost-effective and features a powerful dual-core Arm Cortex-M0+ processor, making it a strong contender for more computation-intensive projects. With its MicroPython compatibility, it also offers a more high-level, user-friendly programming environment which is great for beginners.
On the other hand, Arduino boards have been a mainstay in the DIY electronics realm for a long time and boast a large, active community. This means a wealth of resources, tutorials, and project ideas are readily available. Additionally, Arduino's hardware is diverse, with a wide range of boards to choose from, each with different capabilities.
Are MicroPython and Python related?
MicroPython and Python are indeed related, but it's important to recognize that they serve different functions and operate in varying environments. MicroPython is a lean, efficient implementation of the Python 3 programming language, specifically designed to run on microcontrollers and in constrained environments. It includes a small subset of Python's standard library and is optimized to run on hardware with limited resources, like the Raspberry Pi Pico.
While the syntax and core concepts remain consistent between Python and MicroPython, the latter does not support all the features and libraries of standard Python due to the constraints of the microcontroller environments for which it is designed.
How much RAM does MicroPython use?
MicroPython is designed to be a compact and efficient version of Python, specifically tailored to run on microcontrollers that have limited resources. As such, it is quite lean in its memory usage. The exact amount of RAM MicroPython uses can depend on the specific script being run, as well as the microcontroller it is operating on. Generally, a basic MicroPython environment can run with as little as 8KB of RAM for heap storage, although more complex applications may require additional memory. Always consider the memory constraints of your specific microcontroller when designing your MicroPython applications.
*Contributors: Written by Rohit Budania; Lead image by Shivendra Singh
