Sep 23, 2024 By Team YoungWonks *
Chapter 1: Getting Started with Scratch
Scratch is a more enhanced and upgraded version of ScratchJr. Before embarking on your 3D game creation journey, make sure you have a Scratch account. If you don't have one, you can easily create it on scratch.mit.edu. Once you're set-up, click on "Create" to start a new project.
You will also get full access to Scratch tutorials through our Student Portal once you enroll in YoungWonks Coding School. We have a Scratch tutorial right from the beginning. Scratch is a block-based programming language that uses visual blocks for ease of understanding.
Chapter 2: Understanding Sprites
In Scratch coding, sprites are the characters or objects that interact within the game. To create a 3D effect, you'll need a sprite that can be viewed from multiple angles. Consider using a simple character or an object that represents the player. You can import a sprite from the Scratch library or create your own using the sprite editor.
Chapter 3: Creating the Illusion of 3D Modeling in Scratch
While Scratch doesn't have built-in 3D modeling tools, you can create the illusion of 3D by using multiple sprites. Duplicate your main sprite and slightly adjust the positioning of the duplicates to give the illusion of depth. This technique is commonly known as pseudo-3D or 2.5D.
Chapter 4: Introducing Raycasting for 3D Rendering
Raycasting is a fundamental technique for rendering 3D environments. In the context of Scratch, you can simulate raycasting by projecting lines from your sprite in different directions. These lines will help create the illusion of distance and depth, essential for a 3D environment.
Chapter 5: Creating a Maze Game
Let’s put our newfound knowledge into action by building a simple 3D maze game. Start by designing a maze using Scratch's backdrop feature. Utilize different backdrops to represent various sections of your 3D environment. Then, implement raycasting to detect walls and guide your sprite through the maze.
How to Make a 3D Maze: Step by Step
Step 1: Create a 2D Maze
Before we get to the 3D aspect, we’ll need to create a simple 2D maze.

Above, you’ll see a maze sprite drawn with green lines. The two opening points (red lines) are the "exits" of your game.
With your maze, you can use raycasting to create the 3D effect.
To keep things simple, you can replicate the maze sprite example or even make one with less lines. Use an image to trace or draw your own. Whatever works better for you!
Next, duplicate your maze sprite. Label it as "exit" and trace lines at the exits. Then, delete the duplicate maze and leave the trace lines.

Create a message that says, "You Win!!!" to that effect. Use the code to trigger it when you pass the opening points ("exits").


Use the above script to display the winning message. Sound effects are optional.
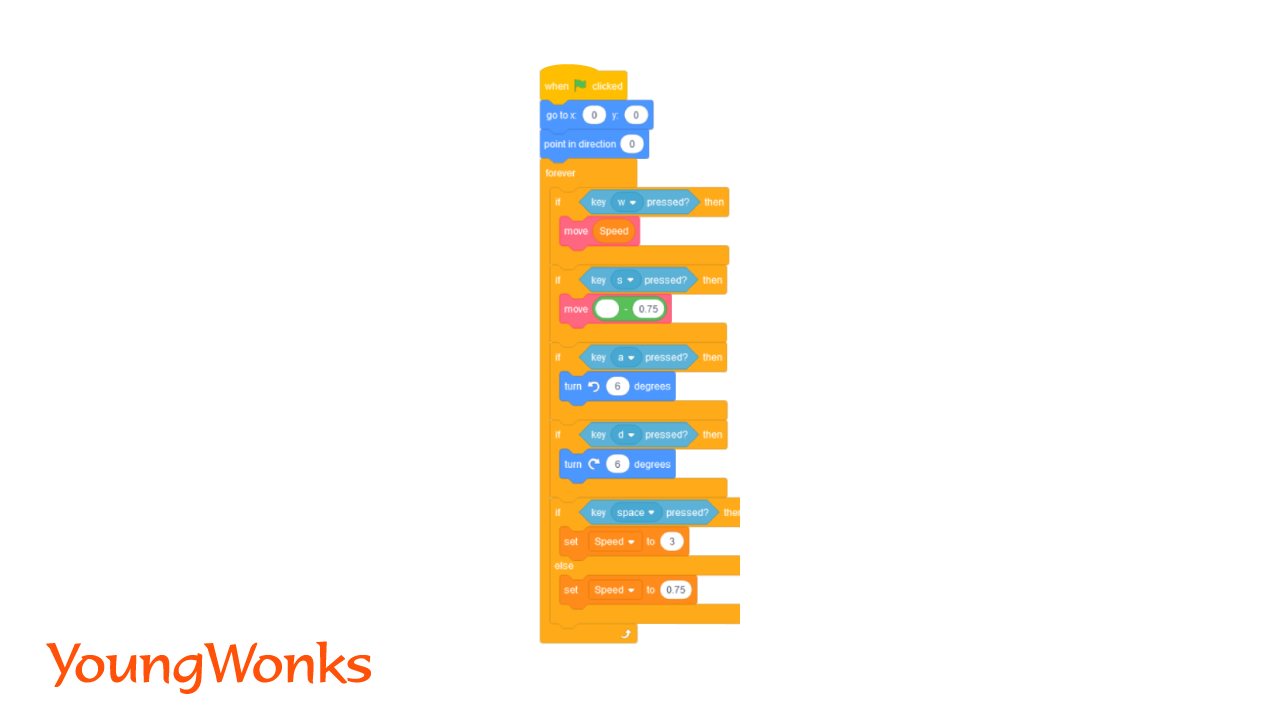
Finally, create a player sprite.
Again, to keep it easy, draw a basic box. You can then write your movement code.
Once you’ve created your basic maze sprites, you'll be ready to create a radar!
Step 2: Make a Radar
Ready for some 3D magic? Let’s do it!
A radar in Scratch keeps track of the space between the player and the walls. This allows for the game visuals to adjust every time the player moves. This is accomplished with mathematical functions built into the block coding.

The above set of codes are used to broadcast draw once the calculated distance is received from the radar.

Above, you'll find an example of radar code. Start by making a custom "define ()" block (the pink one). Be sure to check the "Run without screen refresh" box. Then add the other blocks with their corresponding variables.
Note: setting the angle to -50 degrees and the distance to 50 gives your player a 100-degree field of view (50+50=100).

The above piece of code is for the speed of motion of the sprite.
Finally, use the above code to keep the player from walking through walls. Ready to get your 3D journey on the road? Let's finish up with rendering!
Step 3: Render with Scripting
Got the first two steps done? Awesome! This last step is easy.

Basically, this sprite will allow for lines (or maze walls) to appear thicker when close and thinner from a distance. It’s a simple code as far as building it with Scratch blocks, but the 3D effect makes for a much more interactive experience!

As noted in the above “Make a Block” image, be sure to run without a screen refresh! Otherwise, it won’t run properly.
There you go, coders! Remember, this is just the beginning. There’s a whole world of possibilities out there with Scratch 3D modeling. Let your creativity flow!
Chapter 6: Taking It to the Next Level
To elevate your 3D video game, consider adding multiplayer functionality or scrolling backgrounds. Multiplayer features can be implemented using Scratch’s broadcast and receive blocks, allowing players to interact with each other. Scrolling backgrounds create a sense of movement and exploration, adding dynamism to your game.
Chapter 7: Showcasing Your Project
Once you’ve completed your 3D game and made any final changes, you can share it with the Scratch community by clicking the "Share" button in the top right corner of the Scratch editor, not the green flag! The green flag simply runs your game.
Take advantage of the Scratch Wiki to document your project, providing insights into the development process and sharing tips with fellow coders.
Chapter 8: Exploring Scratch 3.0 and Beyond
Scratch 3.0 introduced several new features, allowing you to create more complex and intricate games. Experiment with these features and explore Scratch’s evolving capabilities for 3D game development. Educators worldwide are also coming up with innovative ways to introduce these advanced concepts.
Conclusion
In this tutorial, we've covered the basics of creating a 3D game in Scratch, touching on essential concepts such as sprites, raycasting, and game design principles. By following these steps, beginners can embark on their game development journey, learning valuable skills in the process. As you continue to experiment and iterate, you’ll discover endless possibilities for creating engaging and interactive 3D projects in Scratch.
*Contributors: Written by Shankar V; Edited by Disha N; Lead image by Shivendra Singh